DIY Theme Park Inspired Lawn Decor for Halloween
DIY Theme Park Inspired Lawn Decor for Halloween.... on a Budget
Decorating your lawn can get expensive for Halloween but with a little creativity and your favorite theme you can create a simple yet fun lawn decor that's not too scary for the little ones. We normally get our inspiration from the local theme parks and I have 2 examples to share with you, both costing around $100 to create from scratch (less if you have some decorations of your own already). Check out my designs and tips to make your own.
Nightmare Before Christmas DIY Halloween Lawn Decor
TIP: First things first, choose your theme. I have done both Nightmare Before Christmas and The Great Pumpkin Charlie Brown. After choosing a theme, I would take inventory of any decorations you may have that you could incorporate into your design theme or vice versa. Artificial pumpkins, cobwebs, headstones are things many normally have on hand that can easily be added to your overall display. Also I try to group my decorations in a vignette creating more of a visual impact instead of spreading it out to try to fill the entire lawn keeping costs down. Think of a spot that will be easily seen from the street and passed by trick or treaters approaching your home. I place mine directly to the side of my porch. Consider any plants or trees you have to incorporate them as well.
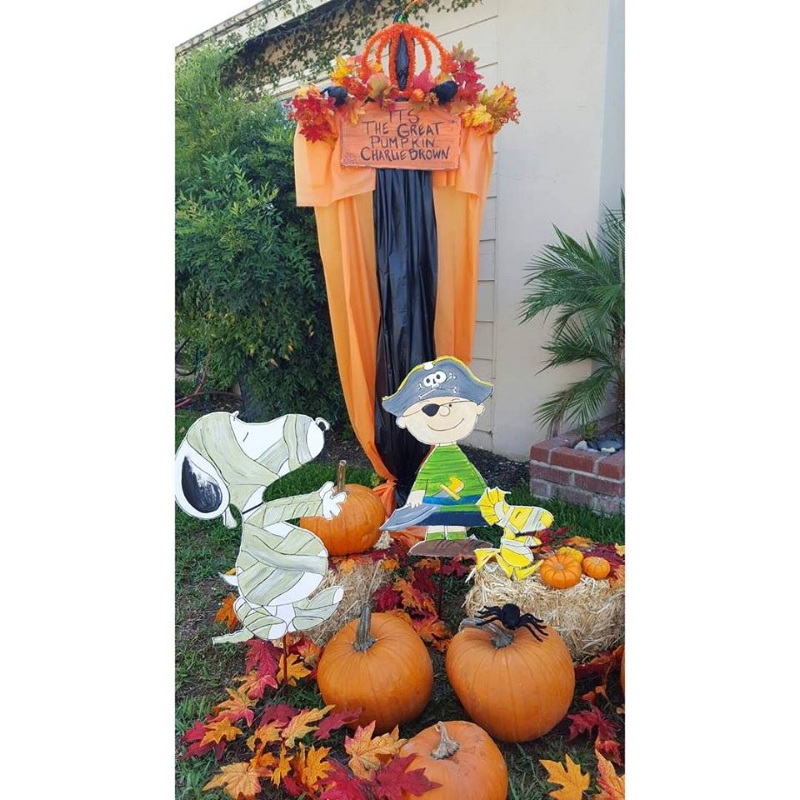
It's The Great Pumpkin Charlie Brown DIY Halloween Lawn Decor
To create a Banner that is similar to what theme park uses around the parks, here's what you will need. For the frame work I used some PVC and a wood rod I had. You can use 1" x 2" wood, Plastic piping (PVC) or or a combo like I did. If you don't have anything on hand you can easily find them at any local hardware store.To Recreate The Great Pumpkin Charlie Brown Theme you will need the following:
1 orange and 1 black vinyl table cloth (54" x 108"),
4- assorted fall leave bunches
2-small faux pumpkins
2-Black Birds and a tinsel pumpkin
OR any assortment of decorations can be used to adorn the yard "banner"
The supplies for the Banner were all purchased from my local dollar store.
Example of Disneyland Banners for Halloween Time
Step One: I secured the pipe and wood rod together using duck tape (it's not going to show) Leaving around 12"-16" at the top to brace the center piece of choice. (mine was the pumpkin)
Step Two: You can hot glue or staple the vinyl table cloths to the crossing rod gathering up to fill in the width (which on mine was aprox. 3') I folded back around 16" to create a front flap and to shorten the over all length.
Step Three: Take the black table cloth and gather it up and attach atop the Orange one to create a center stripe, flapping over enough to cover pipe on top.
Step Four: Layer your artificial foliage along the top of the rod, adding a center piece and what ever else you like. I used a hot glue, a staple gun would work really well too.
As for the cut out characters for both themes, I used foam core boards. After drawing the designs on the foam core I painted them with acrylic paint and cut the figures out using an exact 'o' knife after they dried completely. With a small wood dowel, taped it to the back creating a stake to secure the characters into the ground. Arranged everything in front of the banner and add pumpkins (real or artificial). The nice thing about all the animated characters is that they are easy to draw and there are so many Halloween themed ones to choose from.
The Nightmare Before Christmas DIY display was accomplished by doing the following: I hot glued Sally to the back of the tall head stone, added a small picture of Jack in the background to create perspective, used Pillow stuffing to create the snow, draped cob webs, dried and artificial leaves and laid down top soil to give the ground a look of fresh dug plots for the grave markers. To finish the look off I added purple colored Christmas lighting and a fog machine for more of a spooky yet fun effect.
So what to do for this year? I'm thinking Disney Pixar's Coco!


